Hints & Solutions – Pages 20 to 41

We are currently transcribing Constable Waddington’s notes, so these pages are not yet complete. Please bear with us while we decipher his handwriting.

20 - 21 – The Kensington Museum

Can you correctly mark in the compass directions on the bottom right corner of the map?

Hint 1

Remember, when you sat in the Museum Library in the morning, the sun was streaming in through the window.

Hint 2

It doesn’t matter where you are in the world… the sun always rises from in the same direction.

Solution

22-23 - Doctor Elizabeth Knight

Can you mark all 8 public galleries onto the Museum Floorplan in the right places?

Hint 1

Think about the key statements given to you by the Museum Director. Utilise those statements to figure out which of the eight public galleries go where on the floorplan. Begin by working out which of her statements can only apply to one of the public rooms.

Hint 2

You know the Hall of Minerals is opposite the lifts. That means the other smaller public gallery must be the Hall of Insects and the only other gallery with no windows must be the Gallery of Natural History. Then I reckon you need to work out which room on the map can only be reached through another room.

Solution

24-26 - Grand HAll - The Crime Scene

Can you work out the date and timeframe within which the Tiger’s Eye was stolen?

Hint 1

Cor! Look at that moon tonight!

Hint 2

Utilise the lunar chart to work out what type of moon it is. Once you’ve worked that out I reckon you can use the calendar to narrow down which dates in February today might be. Once you’ve got the right day and date you should then be able to work out what time the Tiger’s Eye was stolen from Dr. Knight’s statement.

Solution

Between 8:30pm and 8:32pm on Wednesday 17th February 1926

27 - Footprint

Which 3 shoe sizes might belong to the thief?

Hint 1

Use the ruler. Come on, even I can get this one!

Hint 2

Once you measured the footprint study the shoe size measurement list carefully, you’re looking for a range of three sizes.

Solution

Sizes 7, 8 and 9

28-29 - Hieroglyphics

Can you use the stone slabs to decipher the hieroglyphic alphabet?

Hint 1

I’m no archaeologist but those stones look like a pair to me.

Hint 2

I reckon it says the same thing on both of ’em!

Solution

31 – Locked door – The Deputy Director’s Office

Can you work out the 5 digit code and unlock the door?

Hint 1

You’ve really got to sink your teeth into this one.

Hint 2

The teeth and the gaps between them will help you generate the code.

Solution

4 7 2 8 6

The code is hidden in the mouth of the dinosaur skull. Simply count the number of teeth along the upper and then lower jaws until you get to a missing tooth; each complete group of teeth gives you one digit in the code.

32-33 - Deputy Director

Can you work out which name on the list belongs to the Museum Deputy Director?

Hint 1

I reckon the answer is clearly on display in the vicinity.

Hint 2

We’ve got one of them birds in our garden

Solution

Earnest Robinson

34-35 - Staff Photographs

From looking at the photographs and bearing in mind what you already know, can you match all the suspects’ names to their photographs on the suspect sheets?

Hint 1

Remember you already met two of the suspects face to face. Now I can see ’ere that Mary, Sam and Harriet are in that photo, but only Mary and Sam are in that one.

Hint 2

Sam is featured in the bottom centre photo of 6 people but Harriet and Mary aren’t.

Solution

SUSPECT A = Richard November
SUSPECT A =
Richard November
SUSPECT B = Sam Cooper
SUSPECT B =
Sam Cooper
SUSPECT C = Earnest Robinson
SUSPECT C =
Earnest Robinson
SUSPECT D = Mary Hawkins
SUSPECT D =
Mary Hawkins
SUSPECT E = Harriet Wheeler
SUSPECT E =
Harriet Wheeler
SUSPECT F = Bill Cooper
SUSPECT F =
Bill Cooper
SUSPECT G = Elizabeth Knight
SUSPECT G =
Elizabeth Knight
SUSPECT H = Stephen Cartwright
SUSPECT H =
Stephen Cartwright

41 – Locked Door – Hall of Modern Technology

Can you work out the 4 digit code and unlock the door?

Hint 1

There’s quite a few layers to this.

Hint 2

You need to use all three diagrams at once to work out the code.

Solution

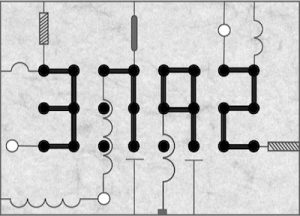
3 7 9 2

Modern Tech solution

To solve this visual puzzle you need to imagine what you would see if you laid the three circuit diagrams over the top of each other. The lines from all three circuit diagrams combined reveal the correct 4-digit code.
en_GBEnglish

BECOME A MYSTERY AGENT

10% discount

when you subsCribe

Puzzles, discounts, competitions and news.
Free to join.

THANK YOU & Welcome!

Look out for an email in your inbox (check spam/junk just in case).